Note: This article was written when Windows Server 2008 was still RC1. Changes might occur later once the product is RTM'd
If you have set up a domain controller previously with Windows 2000 Server, or Windows Server 2003, then you would be familiar with thedcpromo.exe command, it will also be used to set up a Domain Controller on Windows Server 2008.
To use the command, click on Start > Run > and then write dcpromo > Click OK
The system will start checking if Active Directory Domain Services ( AD DS) binaries are installed, then will start installing them. The binaries could be installed if you had run the dcpromo command previously and then canceled the operation after the binaries were installed.
The Active Directory Domain Services Installation Wizard will start, either enable the checkbox beside Use Advanced mode installationand Click Next , or keep it unselected and click on Next
The following table lists the additional wizard pages that appear for each deployment configuration when you select the Use advanced mode installation check box.
Deployment configuration
Advanced mode installation wizard pages
New forest
Domain NetBIOS name
New domain in an existing forest
On the Choose a Deployment Configuration page, the option to create a new domain tree appears only in advanced mode installation.
Domain NetBIOS name
Source Domain Controller
Additional domain controller in an existing domain
Create an account for a read-only domain controller (RODC) installation
Specify Password Replication Policy
Attach a server to an account for an RODC installation
Install from Media
Source Domain Controller
The Operating System Compatibility page will be displayed, take a moment to read it and click Next
Choose Create a new domain in a new forest, Click Next
Enter the Fully Qualified Domain Name of the forest root domain inside the textbox, click Next
If you selected Use advanced mode installation on the Welcome page, the Domain NetBIOS Name page appears. On this page, type the NetBIOS name of the domain if necessary or accept the default name and then click Next.
Select the Forest Functional Level,choose the level you desire and click on Next. Make sure to read the description of each functional level to understand the difference between each one.
In the previous step, If you have selected any Forest Functional Level other than Windows Server 2008 and clicked on Next , you would then get a page to select the Domain Functional Level. Select it and then click on Next
In the Additional Domain Controller Options page, you can select to install the Domain Name Service to your server. Note that the First domain controller in a forest must be a Global Catalog that's why the checkbox beside Global Catalog is selected and it cannot be cleared. The checkbox is also selected by default when you install an additional domain controller in an existing domain, however you can clear this checkbox if you do not want the additional domain controller to be a global catalog server. The first domain controller in a new forest or in a new domain can not be a Read Only Domain Controller (RODC), you can later add a RODC but you must have at least one Windows Server 2008 Domain Controller.
I want to set my DC as a DNS Server as well, so I will keep the checkbox beside DNS Server selected and click on Next
If the wizard cannot create a delegation for the DNS server, it displays a message to indicate that you can create the delegation manually. To continue, click Yes
Now you will have the location where the domain controller database, log files and SYSVOL are stored on the server. The database stores information about the users, computers and other objects on the network. the log files record activities that are related to AD DS, such information about an object being updated. SYSVOL stores Group Policy objects and scripts. By default, SYSVOL is part of the operating system files in the Windows directory
Either type or browse to the volume and folder where you want to store each, or accept the defaults and click on Next
In the Directory Services Restore Mode Administrator Password (DSRM) page, write a password and confirm it. This password is used when the domain controller is started in Directory Services Restore Mode, which might be because Active Directory Domain Services is not running, or for tasks that must be performed offline. Make sure that you memorize this password when you need it. I know many administrators forgot it when they most needed it !!
Make sure the password meet the password complexity requirements of the password policy, that is a password that contains a combination of uppercase and lowercase letters, numbers, and symbols. else you will receive the following message :
Summary page will be displayed showing you all the setting that you have set . It gives you the option to export the setting you have setup into an answer file for use with other unattended operations, if you wish to have such file, click on the Export settings button and save the file.
DNS Installation will start
Followed by installing Group Policy Management Console, the system will check first if it is installed or not.
Configuring the local computer to host active directory Domain Services and other operations will take place setting up this server as a Domain Controller
Active Directory Domain Services installation will be completed, click Finish, then click on Restart Now to restart your server for the changes to take effect.
Once the server is booted and you logon to it, click on Start > Administrative Tools , will notice that following have been installed :
Active Directory Domains and Trusts
Active Directory Sites and Services
Active Directory Users and Computers
ADSI Edit
DNS
Group Policy Management
Summary
Setting up a Domain Controller in Windows Server 2008 to install Active Directory Domain Services is performed by running the dcpromo command. It has some new options like using Advanced Mode Installation, and exporting settings to an answer file . In my next articles, I will show you how to perform an unattended installation to set up your domain controller, and also how to set up an additional domain controller using Windows Server 2008.
The "Other" Facebook inbox you didn't know you had
.
I know loads of Facebook users who never bother to check their notifications. You know, that area in the top-left corner of the screen, the one with the little red number badges?
From left to right, those little icons consist of the following: Friend Requests, Inbox, and Notifications.
To me, all three are like inboxes, in that they should be checked and cleared out on a regular basis.
But let's talk about Inbox itself for a moment. When you click that icon, you'll see a list of messages (emails, for all intents and purposes) you've received from people you know.
However, what's very easy to overlook is the "Other" option, which is grayed out and barely visible atop the inbox frame. Click that; you may be surprised by the result.
Facebook's little-known Other inbox.
Surprised, as in you have another inbox you didn't know you had. According to Facebook, the Other folder is "where you'll find messages and emails that have been filtered out of your inbox"—in other words, messages from people you probably don'tknow.
Now, you may have none at all. Or you may have a ton of them, all unread and unanswered. Hope there was nothing important in there from, like, two years ago.
This black hole goes hand in hand with Facebook's newly monetized messaging system-, through which people can spend $1 to send you a message that lands in your proper inbox, and not the Other folder. And I suppose Facebook is banking on the fact that almost no one knows that folder exists.
So, consider this your public service announcement. And this as well: If you want to change your message-filtering preferences, Facebook offers a simple how-to. Except that step #3 is wrong: You won't see the Edit Preferences option unless you first click on one of the messages in your Other folder.
Any thoughts on this? Just par for the course with Facebook, that endlessly confusing beast, or much ado about nothing?
Admit it: You once owned a crazy multifunction remote. It had a black-and-white touchscreen and was supposed to let you control every entertainment device in your house from the comfort of your couch. That was the promise, at least. All it really did was force everything into the wrong aspect ratio and switch the clock on your microwave to Greenwich mean time.
Well, good news: The world is now a better place. Your PC is now the most powerful entertainment device in your home, so it’s time to ditch your outdated remote control in favor of your smartphone.
When you have open platforms on both sides of the equation—your Android phone and your PC, rather than “some Panasonic remote” and “some DVD/HDTV combo thing”—it becomes easy as pie to rig up a super-powerful remote-control solution. A smartphone super-remote isn’t just for people who have home theater PCs, either. With a little networking know-how, you can use your Android phone to wake up a dormant PC when you’re away from home so you can start a torrent, stream media to your phone, or just poke around your PC while you’re out and about.
Whether you want a media remote, a remote desktop client, or a way to stream media from your PC to your phone, this guide will teach you how to get set up with a secure, usable connection on the desktop side and connect with the best apps on the Android side.
Make sure your PC is ready for business
A quick word: These instructions assume that your phone and computer are connecting to the same router, and that you’ve assigned a static IP for your computer on the network so that it gets assigned the same local IP address (192.168.x.x) every time it’s turned on. (Remember that bit of necessary networking know-how I was talking about?)
Every router is different, so it’s impossible to provide specific advice for this step. However, the basic process goes something like this:
1. Look up the hard-wired MAC address for the connection you’re using (wired or wireless) on the machine you’re using. On Windows, you can get this info by opening a command prompt and typing ipconfig -all. On a Linux or Mac OS machine, open Terminal and type ifconfig -a. Scroll down to find your router’s IP configuration info—the MAC address will usually be listed as a Physical Address entry that looks like this: a2:b9:34:54:cc:10.
To find a computer’s MAC address, look for the Physical Address entry after running ‘ipconfig - all’ from the command prompt.
2. Go to your router’s configuration page by opening a browser and typing 192.168.1.1 or 192.168.0.1 into the address bar. If that doesn’t work, consult this list of common router addresses or check the manufacturer’s website. Poke your way around the router configuration page until you find the static IP settings, then input the machine’s MAC address, its name, and the IP address you want it to have henceforth (192.168.1.100 is usually a safe choice). With that out of the way, we’re ready to go.
This article is written primarily with Windows in mind, though all of the remote solutions we’ll be using—except Unified Remote—will also work on a modern version of Linux or Mac OS X.
Unified Remote lets you control your PC with your phone
Simple and slick, Unified Remote is a no-brainer to set up. Just pop over to the Unified Remote website, grab their server application for your PC, and run through the install process. You’ll want to set a good strong password, but otherwise everything’s pretty much good to go by default. If you’re asked to open Windows Firewall for this or any other program presented here, go ahead and say yes. Next, grab the Android app either from the Play Store or by following the download link from the Unified Remote website—which also links to the Windows Phone app, if that’s more your style.
Unified Remote lets you use your phone as a mouse, and it works great.
Launch the mobile app and—if you have the Unified Remote server running on your computer and your network is feeling happy—it’ll try to automatically configure itself; if that doesn’t work out, you’ll have to manually add your server by entering your PC’s IP address.
Once you’re connected, dive into the Remotes section of the app. There are lots of options you can play with in here—the two that I’ve found the most useful are ‘basic input’, which lets you use your phone’s touchscreen as a surprisingly intuitive mouse for the PC, and ‘media’, which provides play/stop/volume keys that are similar to the ones you might have on your physical keyboard.
It’s good stuff, and there’s basically no lag if your network connection is stable. The limitation of Unified Remote is, obviously, that it’s useful only as a literal remote—you must be looking directly at the machine you’re controlling to see the effects of your faux-cursor or media keys.
VLC Remote ’n Stream is the best of both worlds
This app is actually called VLC Direct Pro Free, but I like the ’n because it makes this sound like a discount car wash. If you need one app that can act as both a media remote and a channel for streaming media from your PC to your phone, VLC has the answer—if you already use VLC to handle all of your video-playing needs. And if you don’t, you ought to—VLC is open-source, cross-platform, and one of the best media players around; grab it for free from the VLC website.
Now just launch VLC, open Preferences from the Tools drop-down menu, toggle Simple toAll in the bottom right, and in the left-hand menu, expand Interface and click Main interfaces. There should be a Web option—check it. Close the Preferences menu, but leave VLC running for the time being.
There are tons of settings to tweak in VLC, but you just need to enable the ‘Web’ interface to start streaming your media to your phone.
Next, grab the VLC Direct Pro Free Android app from the Google Play store. By default, it will try to scan for a open VLC server on the network. Hopefully, it will automatically hook in to your PC—you did leave VLC running, of course—but if it can’t detect your PC, the app will ask you to input an IP address, just as with Unified Remote.
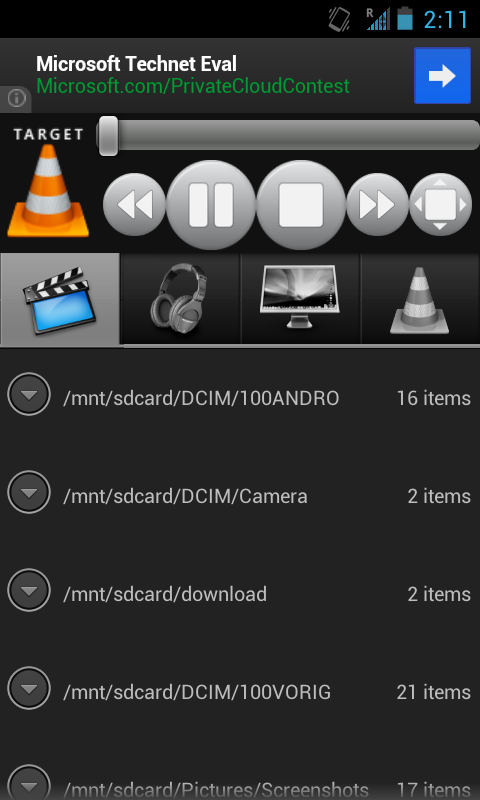
Once you’ve connected, you’ll be greeted with the program’s main interface, which is a little cluttered. The TARGET icon in the top right refers to whether you’re controlling media on your PC (indicated by the traffic cone, the VLC icon) or streaming it to your phone (indicated by the Android icon). The play/pause/stop controls, as well as the volume bar, are at the top right, and the list of files available to you are represented by the four icons arranged horizontally: From left to right, they represent local video on your phone, local audio on your phone, media on your PC, and recent files from your PC. Once you’re playing something on the PC, you’ll get a progress bar at the bottom of the interface that you can use to scrub back and forth through the media. And that’s it!
Well, there are actually three more things you should know about VLC. First, your phone may not be able to play all of the video files that your computer can by default—you’ll want the beta VLC for Android app for that (it integrates pretty well with the app once you associate it with video files by default).
Thing two is that you can actually access this same VLC remote-control interface from another computer on your network via a browser—say, if you’re connected to your media PC from a laptop on the couch. Just go to 192.168.1.100:8080 (if you set a different static IP address, replace it with that one).
Thing three is that you’ll need to have VLC already running on your computer in order to connect to it, and it’s not really your typical background app—you can set it to run at startup, but you’ll occasionally find yourself in the weird situation of having to close and reopen it when you want to switch from watching a given media file directly on your PC to streaming from it. Unfortunately, there isn’t really a good solution here beyond using, say, Unified Remote first to open it up, then jumping in with the VLC remote. The things we’ll do in order to avoid getting up from the couch, huh?
VNC—a.k.a. the cream of the crop
VNC—Virtual Network Computing if you’re feeling fancy—is the best remote media sharing system you’ve probably never heard of. At the most basic level, VNC is an alternative to Unified Remote for when you just want to be able to move a cursor around on the screen—but with a little creativity you can come up with all sorts of other uses. For example, I’ve managed to access my office PC to scan, convert files to PDF, and mail documents while watching a movie on a different computer in another room.
Installing a VNC server on your computer is fairly uncomplicated—Windows users just need to grab the free version of the RealVNC client from the RealVNC website, install it, and set it up on your PC with a good strong password.
The RealVNC server client is free, simple to set up, and relatively lightweight—start it up, and it should just run in the background on your PC.
Ubuntu Linux users must install x11vnc from the Ubuntu Software Center, then open the Startup Applications menu and add this entry: x11vnc -forever -passwd xyzzy -rfbport 5900 -bg, where ‘xyzzy’ is your chosen password.
You’re good to go on the PC side! Now you just need to get a VNC app for your phone. There are lots of Android VNC apps of varying quality, but my favorite one by far is Free bVNC. The configuration page isn’t anything special, but that’s okay because all you need to do is input your PC’s name, IP address, and chosen password, then hit Connect.You may then want to hit the menu key and change the input mode to simulated touchpad (I find it more intuitive), but otherwise, that’s that!
Set up a VNC server and use a free VNC client on your Android tablet so you can access your PC from anywhere.
Now you can use your phone to manipulate your PC from anywhere, though you’ll probably want to do restrict yourself to accessing your PC while your phone is connected to your home network, since streaming a high-res PC desktop requires a significant chunk of bandwidth. Accessing your PC remotely via a 3G or 4G cellular connection can be spotty, but VNC’s performance is excellent if you’re on a solid network—I have a combined desktop resolution of 3360 by 1050, and a wireless network that runs about 150 megabits per second, and I get around 10-20 frames per second while remotely using my PC on my phone while I’m in the garage. It’s not quite seamless, but it’s more than fast enough for most tasks.
Wake-on-LAN powers up your PC from anywhere
If you’re interested in managing torrents or streaming media from your PC, but you’ve got it configured to sleep when idle and you’re either out of the house or too lazy to go into the other room to wake it up, I’m about to blow your mind. Most machines have—and have had for years—a feature called Wake-on-LAN that allows their network card to stay awake while the rest of the machine sleeps, and to switch the PC on when it receives a network message.
Sadly, this is another one of those situations where I can’t give specific instructions, because everyone’s PC is different: if you’re using a network card that’s right on the motherboard, you’ll want to check your BIOS for Wake-on-Lan settings, or else check the Advanced Settings of your network card in Device Manager.
Configuring your network adapter to wake your PC when a "magic packet" is received allows you to wake up your PC at any time by sending it a special signal from another PC or—in this guide—your phone.
On just about any network adapter—except wireless USB adapters—you should be able to find something labeled ‘Wake-on-LAN’ support. Turn that on.
Next, grab the Android app of same name (as with VNC, there are several options, but I’ve gone over them with a fine comb, and the Wake On Lan Android app is the best I’ve seen). This time there’s nothing to run on your PC, but as a trade-off, you’ll have to manually input both your machine’s MAC address (remember when you grabbed it earlier) and the IP address to configure Wake On LAN. Once you think you’ve got it set up, sleep the machine, and give it a shot—oughta come right back to life. Just think of what you can do now by combining these apps: You can wake up your machine, open VLC, and stream a movie to your phone, all without getting out of bed!
Carry your PC in your pocket, wherever you go
Now, a final note about using any of these tricks while you’re away from the house. The 192.168.1.100 address we assigned to your machine is valid only within your own network (which is why everyone in the world is allowed to have that same 192.168.1.100 address). To connect from elsewhere, you’ll need to input your global IP address, which you can look up by simply opening a browser window at home and searching for “What is my IP address?” on Google.
Be warned: Some ISPs will assign a new global IP every time your modem reconnects, which means that you may have to re-check this after a power outage (call your ISP first; they may be feeling generous enough to assign you a semi-permanent IP). Before this will work, though, you’ll need to set up your router to forward requests from outside of your home network to the 192.168.1.100 machine, since connecting to your global IP means you’re no longer specifying which computer you want to remotely access. You’re connecting to your router, so your router needs to know which PC you’re trying to access.
One of these geeks has configured their router to allow them to stream a ripped copy of their Avengers Blu-ray to their phone.
Again, all routers are different, so I can’t give you precise directions here. You’ll want to find the option within your router configuration page for Port Forwarding, then add the relevant ports (select Both for TCP and UDP, if given the option) for your 192.168.1.100 PC. Those ports for the remote services we’ve covered are as follows (if you’re asked to input a range, for example, “port from” and “port to,” just enter the same number for both values):
Wake-on-LAN: 9
VNC: 5900
VLC: 8080
Unified Remote: 9512
Save those settings, step outside with your phone, try to connect using your global IP in any of the above software programs, and you ought to be in business.
Look at that—I started out writing an article about TV remotes and I ended with you getting out of the house. That’s sickening. I’m really not recommending you get any sort of sunburn—I just want you to be able to annoy people by showing off your ability to control your computer from across the room, presumably because you’re too smart/lazy to get up.
Tablets, smartphones, and PCs look different on the outside, but on the inside they rely on the same components: a processor, a GPU, memory, and a storage volume that holds an operating system, device drivers, and applications. Your phone and tablet have smaller screens and fewer peripherals than a typical PC has, but you still end up tapping and clicking your way through your data before pulling out a keyboard—albeit a virtual one—to get real work done.
And like a PC, a mobile device can become clogged with orphaned apps, boatloads of images or personal files, and other random bits of junk data. When that happens, the device may slow down, run out of storage space, or behave erratically. To deal with these problems on an Android tablet or phone, you have to know how to monitor and manage resources, move or delete data, and repair or remove obstreperous apps. Here’s how to handle those tasks.
Assess the situation
Like PCs, Android devices may behave unpredictably as they run short of storage space or memory. Symptoms that this may be happening on your device include apps that randomly crash or won’t load at all, and an inability to save new pictures or videos. To see whether you’re running low on space or memory, open the storage and system monitors built into Android. (Note: The menus I refer to may differ cosmetically from those on your device, depending on the version of Android you’re running, but accessing them should be similar.)
Like PCs, Android devices commonly have a multitude of applications, processes, and services running in the background—even after a reboot.
First, bring down the notification shade or open your app drawer, and tap the Settings icon—it usually looks like a gear. Scroll down the long list of settings until you’ll see a menu item labeled ‘Storage’. Tap the Storage icon, and you should see an informative list that details the amounts of storage space currently occupied by the device’s applications, pictures and video, audio files and ringtones, downloads, and miscellaneous files—along with entries indicating the device’s total storage space and its remaining available space.
In the Storage menu, you can monitor how much storage space is left on your device, but you can’t do much else except format a storage volume—which you won’t want to do unless you’re wiping the device clean. To make changes to the device without wiping anything out, you’ll need to use Application Manager, Android’s built-in app manager. To access it, go to Settings, scroll down the list of options to Application Manager, and tap it (on some devices, you may have to tap Applications and thenManage or Manage Applications). With Application Manager open, you can swipe to reveal three columns of apps: Downloaded, Running, and All.
The Application Manager in the Android system settings menu lets you forcibly stop and shut down most applications.
The list of Downloaded apps will show all of the apps you’ve downloaded from the Google Play store, as well as many of the stand-alone apps that your carrier or device manufacturer installed. The Running apps and All apps lists are self-explanatory. At the bottom of the Download and All columns, you’ll see the amount of storage space that the app is using; and at the bottom of the Running column, the cumulative amount of memory that all of the apps are using appears.
Tapping an app in the Downloaded or All column will reveal a menu with various options, including choices to force-stop an app (basically, killing it to free up memory), to uninstall it, or to clear cache and app data. If you want to remove an app, simply tap the Uninstall button. If you’re trying to rehabilitate an app that’s no longer running properly, however, the ‘Clear cache’ and ‘Clear data’ buttons may resolve the issues. Tapping the ‘Clear cache’ button will wipe out any cached data or files associated with the app, and force recaching of fresh copies. Tapping the ‘Clear data’ button will delete all personal data associated with an app, including login data and high scores for various games. The app should return to its freshly downloaded condition. If an app malfunctions, first tap Clear cache. If that doesn’t help, tap Clear data. If that, too, fails to solve the problem, try uninstalling the app (by tapping Uninstall), restarting your device, and reinstalling the app.
Removing and relocating apps and data
As I’ve mentioned, uninstalling an app is as easy as opening Android’s Application Manager, tapping the app in the All apps list, and then tapping Uninstall.
Unfortunately, some apps that the manufacturer preinstalled on your device may be embedded in such a way that you can’t uninstall them unless you have root access to the phone or custom firmware.
Uninstalling an Android application is as simple as navigating to the Application Manager, finding the app, and tapping 'Uninstall'.
In lieu of uninstalling apps to free up internal storage space on your device, you can move apps to a MicroSD card. Newer devices running Android Ice Cream Sandwich (ICS) or Jelly Bean (JB) may not let you install apps on an SD Card, but older versions of Android have the SD Card installation feature built-in.
Before you move any apps, though, be aware that any app that has an associated home-screen widget or that requires access to certain Android system files won’t function properly when installed on an SD Card. If you’re unsure about which apps you can safely move, you might want to download an app from the Google Play store called App 2 SD. This simple tool scans the apps installed on your device and lists the ones that you can transfer to SD Card without hazard.
To move an app, you can tap it in App 2 SD, which will open the app’s properties in the Application Manager. Once there, tap Force stop and then tap the Move to SDbutton available in the Storage section. After a few moments, the app will reside on your SD Card.
Many versions of Android let you move nonsystem applications and personal data to an external MicroSD card to conserve internal storage space. The App 2 SD app lets you know which apps are safe to move.
Of course, unless you have a ton of them installed, apps probably aren’t the biggest storage space hogs on your device. Photo and video files tend to take up much more space than apps, so it’s worth moving them to an SD Card as well. To ensure that your device stores new photos and videos on your SD Card automatically, open your camera app and navigate to its settings menu (this will vary from device to device).
In the settings menu, navigate to the Storage section, and change the option from ‘Phone’ or ‘Internal Storage’ to Memory Card. If you’d also like to move your existing photos and videos, you can easily do so by connecting your device to a PC via a USB cable; the PC should recognize your phone or tablet as a removable storage device, at which point you can move the picture folder from the device’s internal storage to the SD Card by dragging it over.
If you would rather complete the process on the device itself without using a PC, open the file manager included on your device (if your device doesn’t have one, you can find plenty of them in the Google Play store) and browse to your picture/video folder. Tap and hold it, and in the resulting menu, select Move. Then browse to your SD Card and tap Move Here.
Desperate measures
If your Android device won’t boot properly or is otherwise unusable, clearing the device’s cache partition or restoring it to factory defaults may be your only option. Android-based smartphones and tablets usually come with a built-in recovery tool that you can use to perform some maintenance operations or to restore the device’s software to like-new condition. The procedure for entering recovery mode varies from device to device, but it usually entails powering the device down, and holding some combination of buttons while powering the device back on. On a Samsung Galaxy Note II, for example, you launch recovery mode by powering down the phone and then holding down the home and volume up buttons while simultaneously pressing the power button.
Android devices have a built-in Recovery partition and System Recovery utility that you can used to perform maintenance or to wipe the device of data and restore it to fresh-from-the-factory condition.
Once your device enters recovery mode, you’ll see a basic menu containing a few options for applying updates or wiping various partitions. In most instances, you’ll navigate the menu with your device’s volume up and volume down buttons, and you’ll press the power button to select an item. Before wiping all data and performing a factory reset, it’s a good idea to wipe the cache partition alone, since this less extreme step occasionally resolves stability issues. Wiping the cache partition removes app components, temporary files, and other random bits of data stored in the cache, but the cache will automatically rebuild with fresh data when you reboot your phone and begin using your apps.
If after trying every other fix described here, you still have issues with your Android device, wiping the cache and data partitions and returning it to its factory presets will restore the device’s software to like-new condition. But consider this your last resort: The process of wiping data and restoring factory presets is akin to the process of reformatting your PC’s hard drive and installing a clean copy of Windows. You’ll lose every bit of personal data stored on the device’s internal memory and will have to reinstall all of your apps.
If that outcome is acceptable to you, enter recovery mode on your device and choose the options to wipe cache and wipe data. When you reboot your device, it will behave as though you were powering it up for the first time.
Windows 8 is rife with features and behaviors that conspire to perplex even the most experienced PC users. Not all of them are bad, per se, but few of them are immediately intuitive. Making matters worse, the OS was primarily designed for touch control, and as a result, many mouse and keyboard commands feel like tacked-on afterthoughts.
But help is on the way.
We've assembled a list of our favorite Windows 8 shortcuts, tricks, and workarounds. Many focus on making the most of the OS on a traditional desktop PC, so if you're interested in touch gestures, please check out our article that focuses directly on the Windows 8 touch experience. Now let's start our journey of discovery with a look at easy-to-use (though often tough to remember!) Windows 8 hotkey commands.
Employ the hottest hotkeys we know
In these key combinations, hold down the Windows key (normally located between Alt and Ctrl) and another key, as described on this list.
Press the Windows key to enter the tiled Start screen.
The Windows key + M minimizes everything that's showing on the desktop.
The Windows key + E opens Explorer for quick access to folders.
On the Start screen, press the Windows key + D to instantly get to the desktop.
The Windows key + Tab opens a list of currently running programs.
The Windows key + Print Screen takes a screenshot and saves it in a Screenshots folder nested in your Pictures folder.
To take a screenshot on a Windows 8 tablet, simultaneously press the Windows button and the volume-down button on the tablet chassis.
The Windows key + Q opens a global search menu. Type what you're looking for and where you would like to look.
The Windows key + W opens a search in your system settings to quickly locate and change system properties.
The Windows key + F opens a file and folder search.
The Windows key + Pause opens the system properties page to show you a quick rundown of your specs.
The Windows key + "," (that's the comma sign!) makes all current windows transparent, giving you a peek at the desktop as long as you hold down the Windows key.
The Windows key + "." (the period) snaps a window to the right or left side (toggling each time you press ".").
The Windows key + R prompts the Run command—useful for quickly launching apps and other routines with a command prompt.
The Windows key + X opens the Quick Access Menu, exposing system functionality such as the Command Prompt, Disk Management, File Explorer, Run, and more. Alternatively, you can right-click on the bottom right corner of the screen to spawn the Quick Access Menu.
The Windows key + I opens the settings menu, giving you quick access to the Control Panel, Personalization, and your Power button, among other features.
The Windows key + O locks orientation on devices with an accelerometer.
Zoom in tight
See all your tiles and groups at once with semantic zoom.
The Start Screen is full of nice, big, chunky tiles that represent all your apps. The tiles are easy to see in small groups, but what if you have hundreds of apps installed? Most will be hidden from view, unless you want to do a lot of scrolling. Enter the new semantic zoom feature. If you’re using a touch display, squeeze the Start screen with two fingers to receive a bird’s eye view of your entire screen contents. And the feature is also available to mouse and keyboard users: Simply hold down the Ctrl button, and use your mouse wheel to zoom in and out.
Categorize your apps
Start screen customization for the organized.
Your Start screen can become a cluttered mess if you collect too many apps and other elements that have been pinned to the screen as tiles, so take advantage of built-in organization tools that let you divide everything into labeled groups.
First, drag all the tiles you want to assign to a single group to the far right-hand side of your Start screen in vacant territory; the OS should sequester the tiles together. Once you're satisfied with your assembly, use semantic zoom (described above) to get a bird's eye view of your desktop. Now right-click the group (or simply drag down on it), and select the "Name group" option on the left of the bar that appears below. Type in the name, and enjoy your newly organized Start screen!
Close an application
Closing an app sounds simple enough, but you'll quickly notice that close buttons are hard to find in Windows 8. That's because Microsoft encourages us to run apps in the background where they'll take up minimal resources, but still be accessible at any time.
Nonetheless, if you insist on being rebellious, you can close an app by dragging it with your mouse or finger from the top of the screen all the way down to the bottom. As you drag, the app will miminize into a thumbnail, and when you reach the bottom, it will disappear from view. Alternatively, you can still close apps via Alt + F4 and through the Task Manager.
Use centralized, contextual search
Search for anything in any app from one place.
The Search function located on the Charms bar is packed with power, letting you search the directories of not only your Windows 8 machine, but also the greater Windows ecosystem. Simply choose the bucket of data you want to sift through—it could be all your installed apps, your system settings, your files, your mail messages, or even an external service like the Windows Store or Bing Maps—type in a keyword, and hit Enter. The Search function will then return the results, perfectly contextualized for the database you’ve addressed
Oh, and how's this for cool? You don't even need to hit the Charms bar to access Search. From the Start screen, simply start typing, and you'll be quickly whisked to the text-entry field for search queries. Try it. It works!
Adjust privacy settings
Customize your privacy settings to your liking.
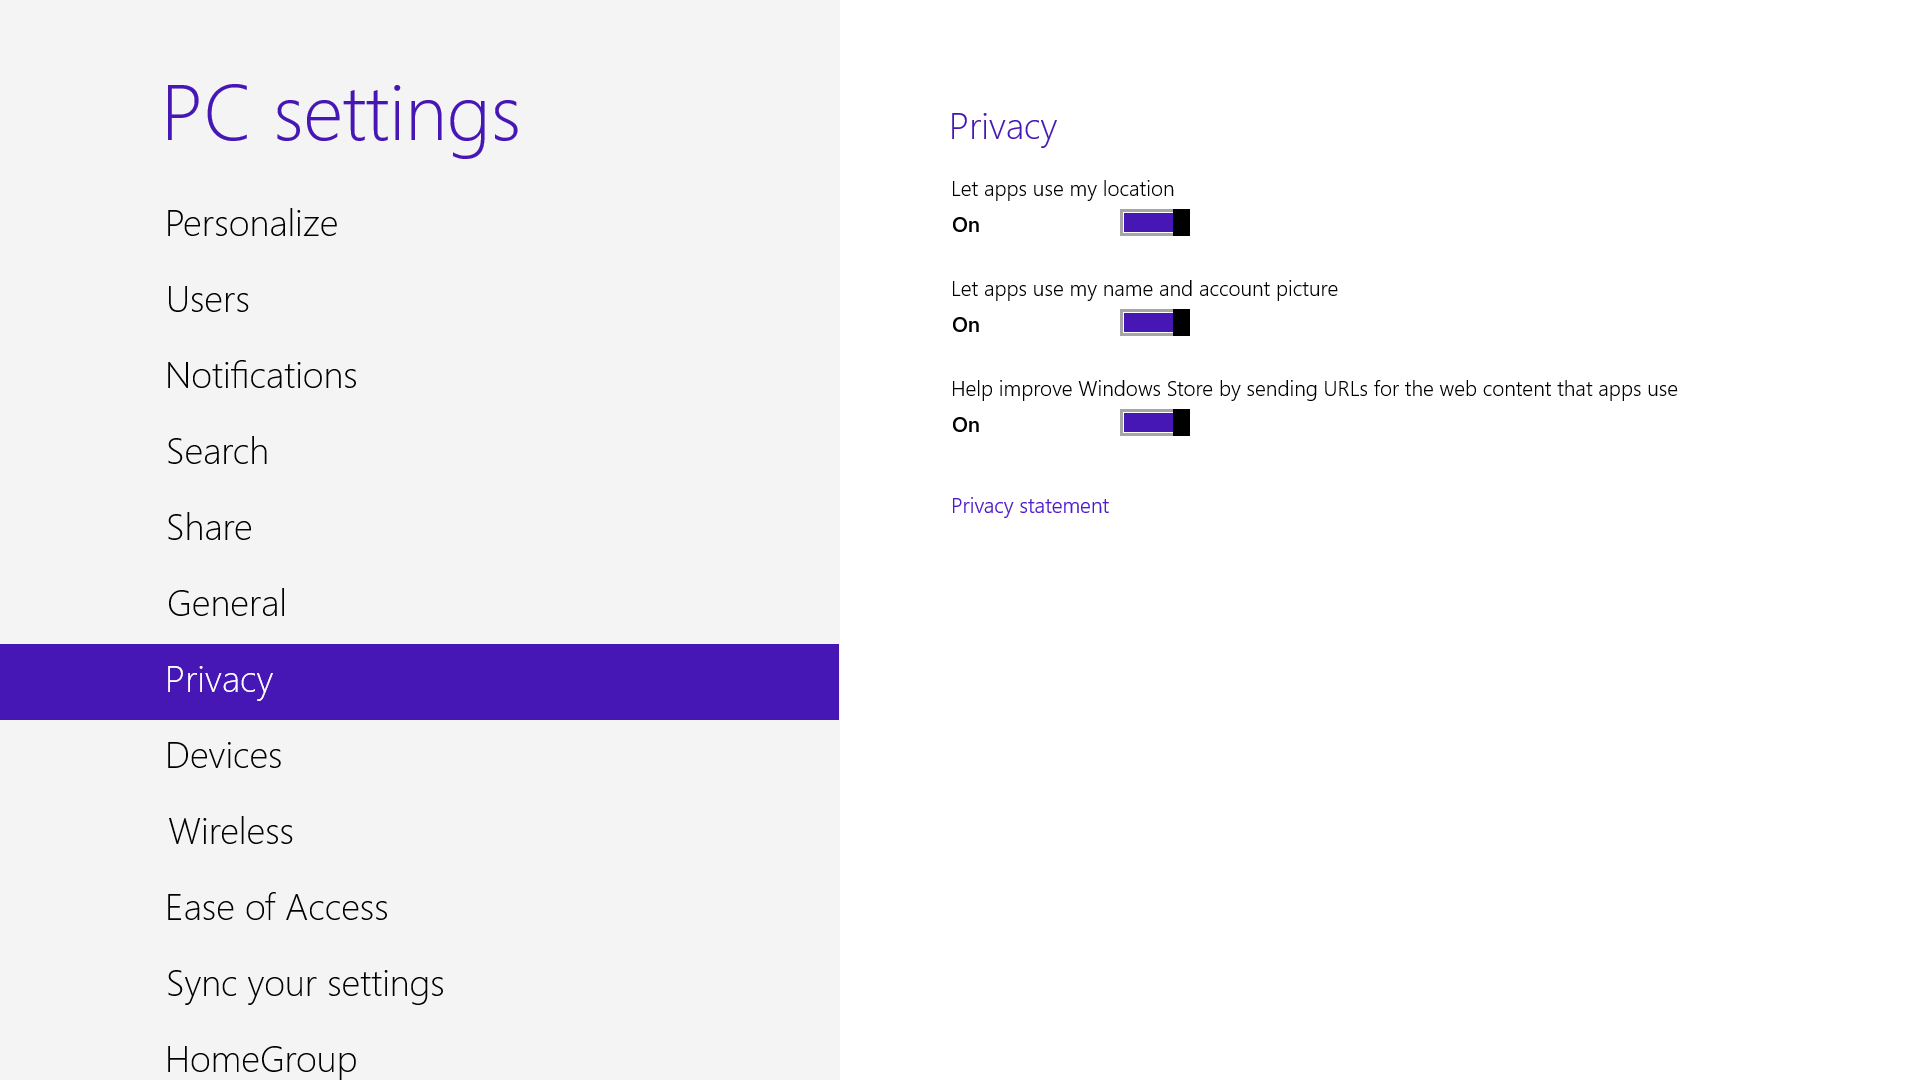
A lot of apps tap into very personal information by default. Indeed, your pictures, location, and name are liberally woven throughout the system, and like many users you may not be comfortable trusting your machine with that much sensitive data. To adjust the settings, press the Windows key + I, and go to Change PC Settings. Select the Privacy option, and personalize the settings for your personal data there.
Adjust SmartScreen settings
Choose your own level of safety with SmartScreen.
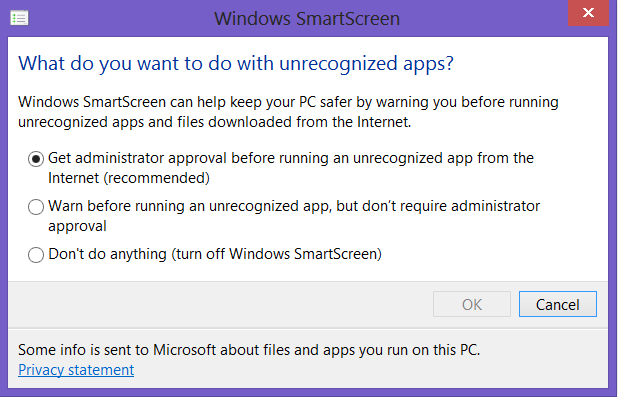
SmartScreen warns you before running an unrecognized app or file from the Internet. While it's helpful to be aware of a file's source, constant warnings can also get a little annoying. By default, you need an administrator's permission, but this can easily be adjusted to just a warning or no indication at all. Using the magic search function described above, type "security" at the Start screen and find the "Check security status" in the Settings tab. From this area, you can adjust various security settings, including the Windows SmartScreen.
Bring up the Quick Access Menu
The secret Start button for power users is hidden at the bottom-left.
Right-clicking on the lower left of the screen—whether you’re in the Windows 8 Start screen or in the desktop—will bring up the Quick Access Menu, which enables a direct line to many key system management chores, including Disk Management, Task Manager, Device Manager, and Control Panel.
Use Windows 8 apps and your desktop simultaneously
Because the Windows 8 experience is split between new Windows 8 Store apps and old-school desktop apps, the operating system is prone to some strange behaviors. Case in point: When running a multimonitor setup, Windows 8 apps will consume your main screen, leaving your secondary screen running the desktop. This arrangement would seemto allow full-screen multitasking among both types of apps—a modern app on the left side, a desktop app on the right side—but this isn’t the case. Indeed, as soon as you begin using the desktop on your secondary screen, the new-style Windows 8 app disappears, and your primary screen begins running the desktop.
But here’s a workaround. On your primary screen, use the new Windows 8 split-screen “snapping” function to run the desktop and a new Windows 8 Store app together. The desktop can take up the left-hand sliver, while the Windows 8 app consumes the majority of the screen. Now use your second display for a full desktop view. In this arrangement, you can fully multitask between new-style apps and desktop apps, and both windows will be large enough to be useful.
Go to Task Manager for Startup items
Task manager is more useful than ever.
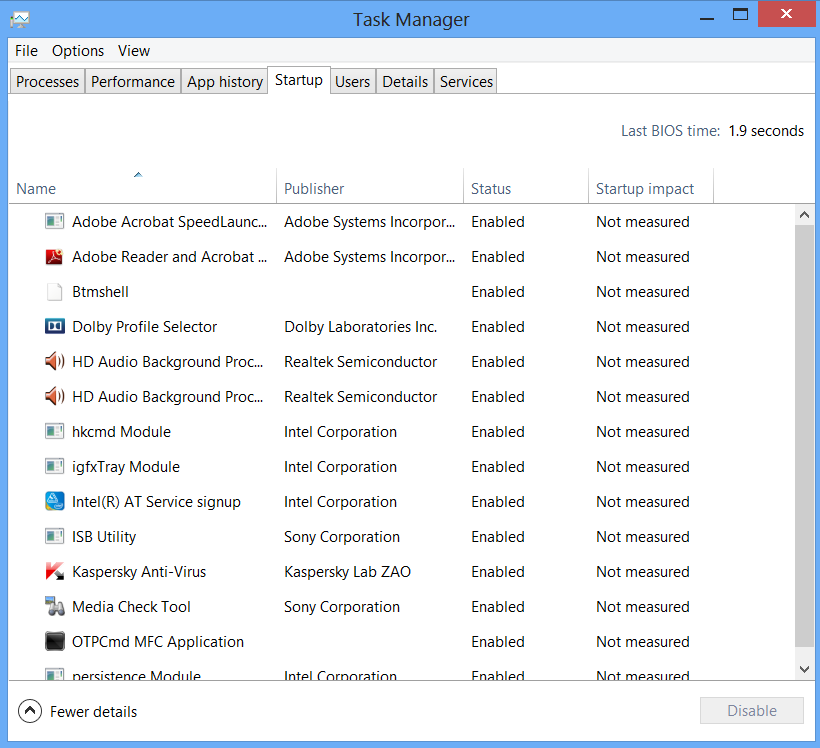
You no longer have to run the MSConfig program to change startup items. Startup items now show up in a tab on Task Manager. Simply press Ctrl + Alt + Del and select Task Manager. Click the "More details" tab at the bottom and find the Startup tab at the top.
Share and share alike
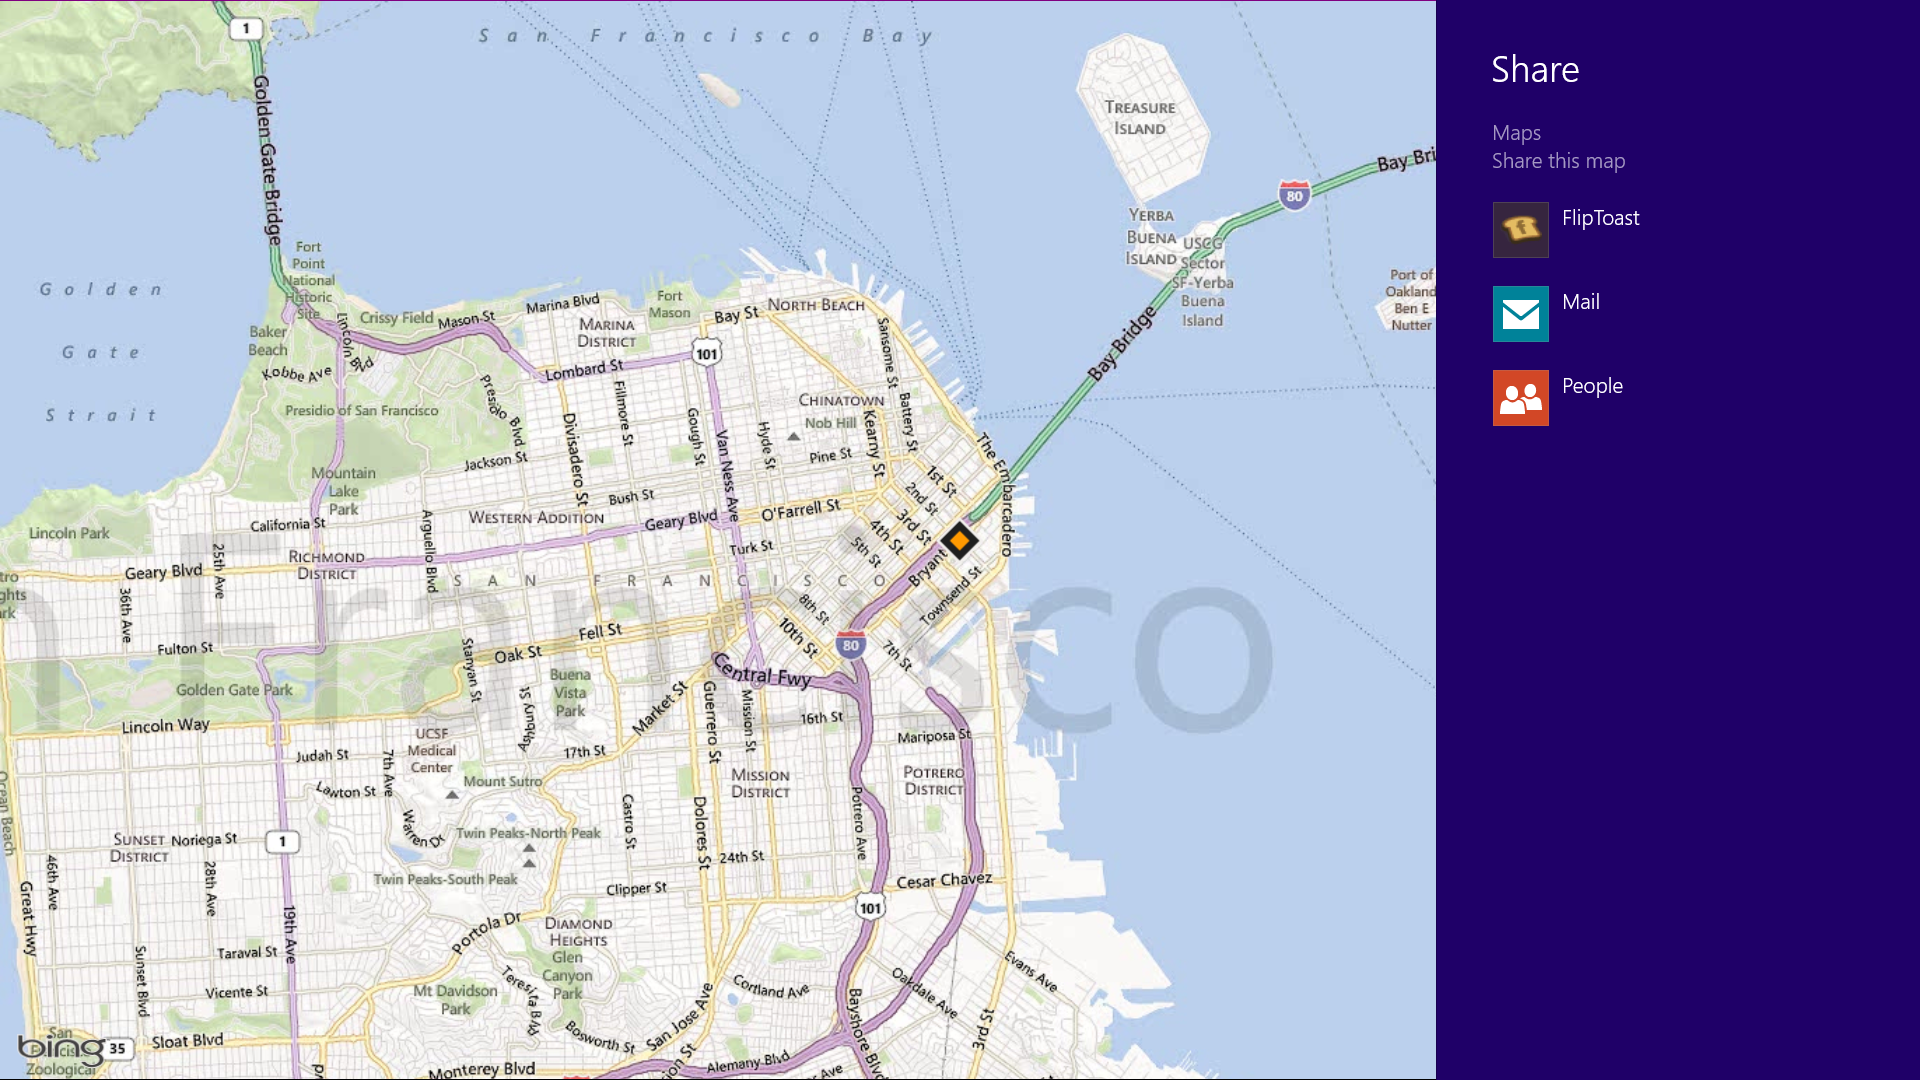
Play with the Share charm in every app.
Windows 8 is Microsoft’s first social-media-aware PC operating system. Using the Share button located on the Charms bar, you can pick any number of elements from your Windows 8 Store apps—say, a location from your Maps app, a news story from the Finance app, or a even a contact from your People app—and then distribute that item to friends via other Windows 8 programs.
Perhaps most conveniently, you can quickly share a photo via email or Twitter, or to your own SkyDrive or Windows Phone. The Share button is contextual, and the more you use it, the more you’ll discover which apps share with each other, and which don’t. (Hint: None of your desktop apps offer sharing opportunities through the Charms menu.)
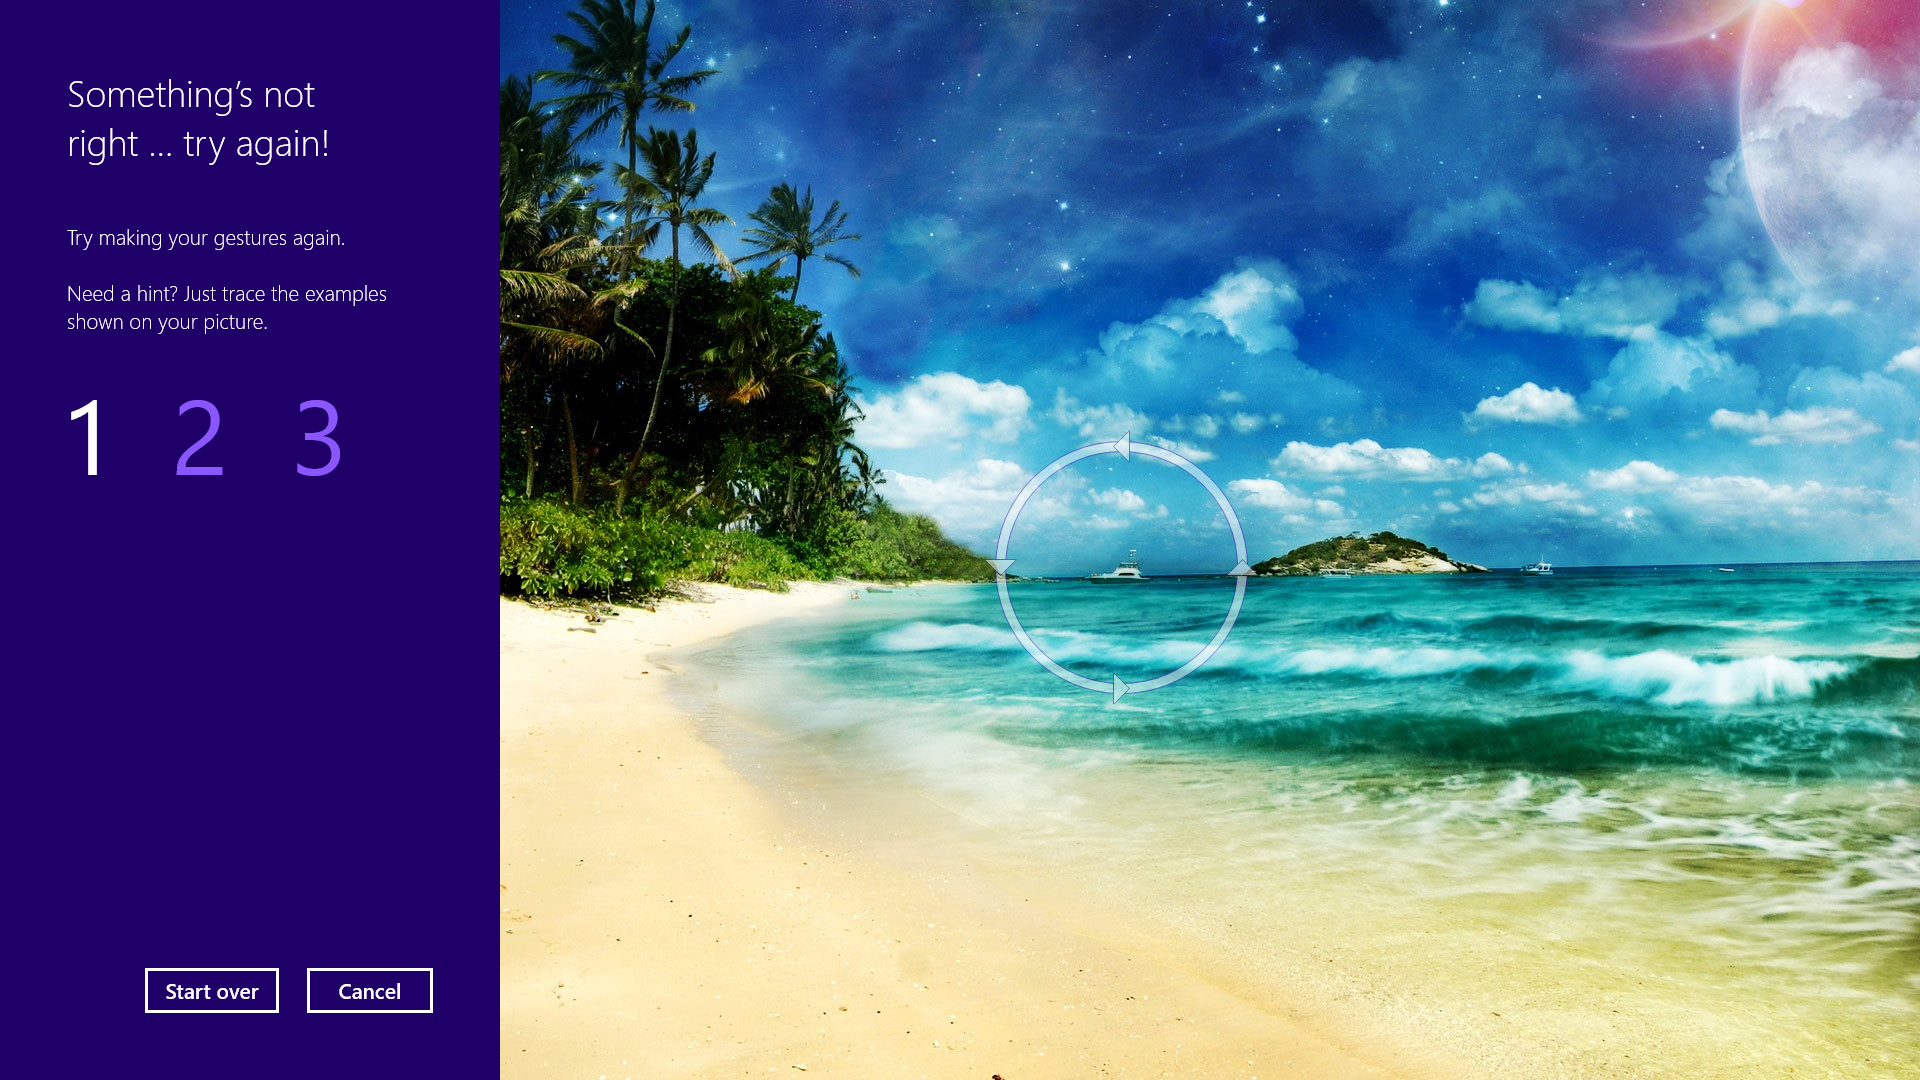
Create a picture password
A fun way to protect your system.
Using a picture password is a fun way keep your device secure while not having to remember a complex password. To enable it, press the Windows key + I to get to the settings charm. Click "Change PC settings" at the bottom right, and go to the Users tab. Under "Sign-in options" will be the "Create a picture password" button. This will give you the option to choose any picture, and then define three gestures anywhere on the image. Your gestures can be circles, swipes and clicks.
For example, to set a picture password for the image above, you could click on the highest palm tree, draw a circle around the island, and then swipe down from the lens flare in the upper right. Just beware: The direction of each gesture matters! After confirming it a couple times, your picture password will be set.
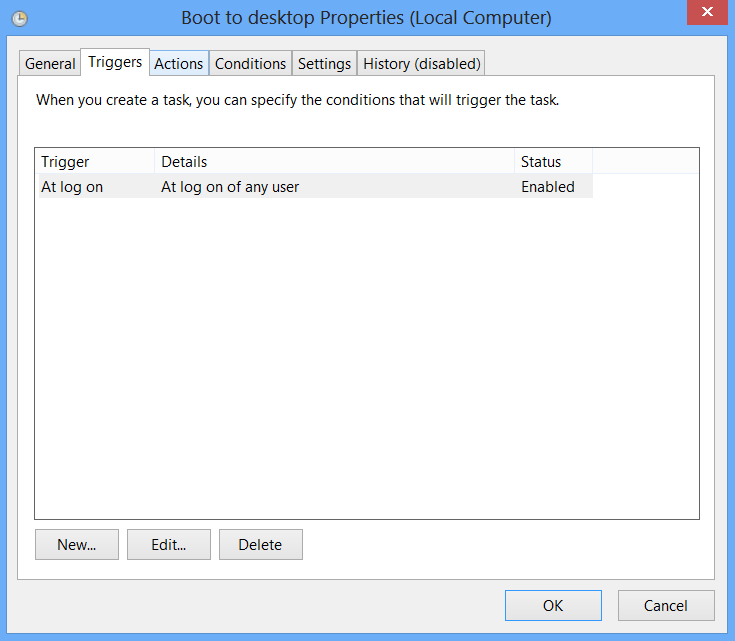
Boot to the desktop without an app
Skip the Start screen and get right to the Desktop.
One of biggest complaints about Windows 8 is that it boots straight to the Start screen—an annoyance for many committed desktop users. The Start8 utility helps you avoid this indignity (among other cool features), but you can actually boot straight to the desktop without installing anything extra.
Go to the start screen and type in "schedule" to search for Schedule Task in Settings. Click on Task Scheduler Library to the left, and select Create Task. Name your task something like "Boot to desktop." Now select the Triggers tab, choose New, and use the drop-down box to select starting the task "At log on." Click OK and go to the Actions tab, choose New,and enter "explorer" for the Program/Script value.
Press OK, save the task, and restart to test it out!
Log in without a username or password
To speed up the log-in process, you may want to disable the username and password log-in screen. You can do so by opening the Run window (press the Windows key + R) and typing in "netplwiz" to access the User Accounts dialog box. Uncheck the box near the top that says "Users must enter a user name and password to use this computer." ClickOK, and enter the username and password one last time to confirm your choice, and you are all set for easy access to your system
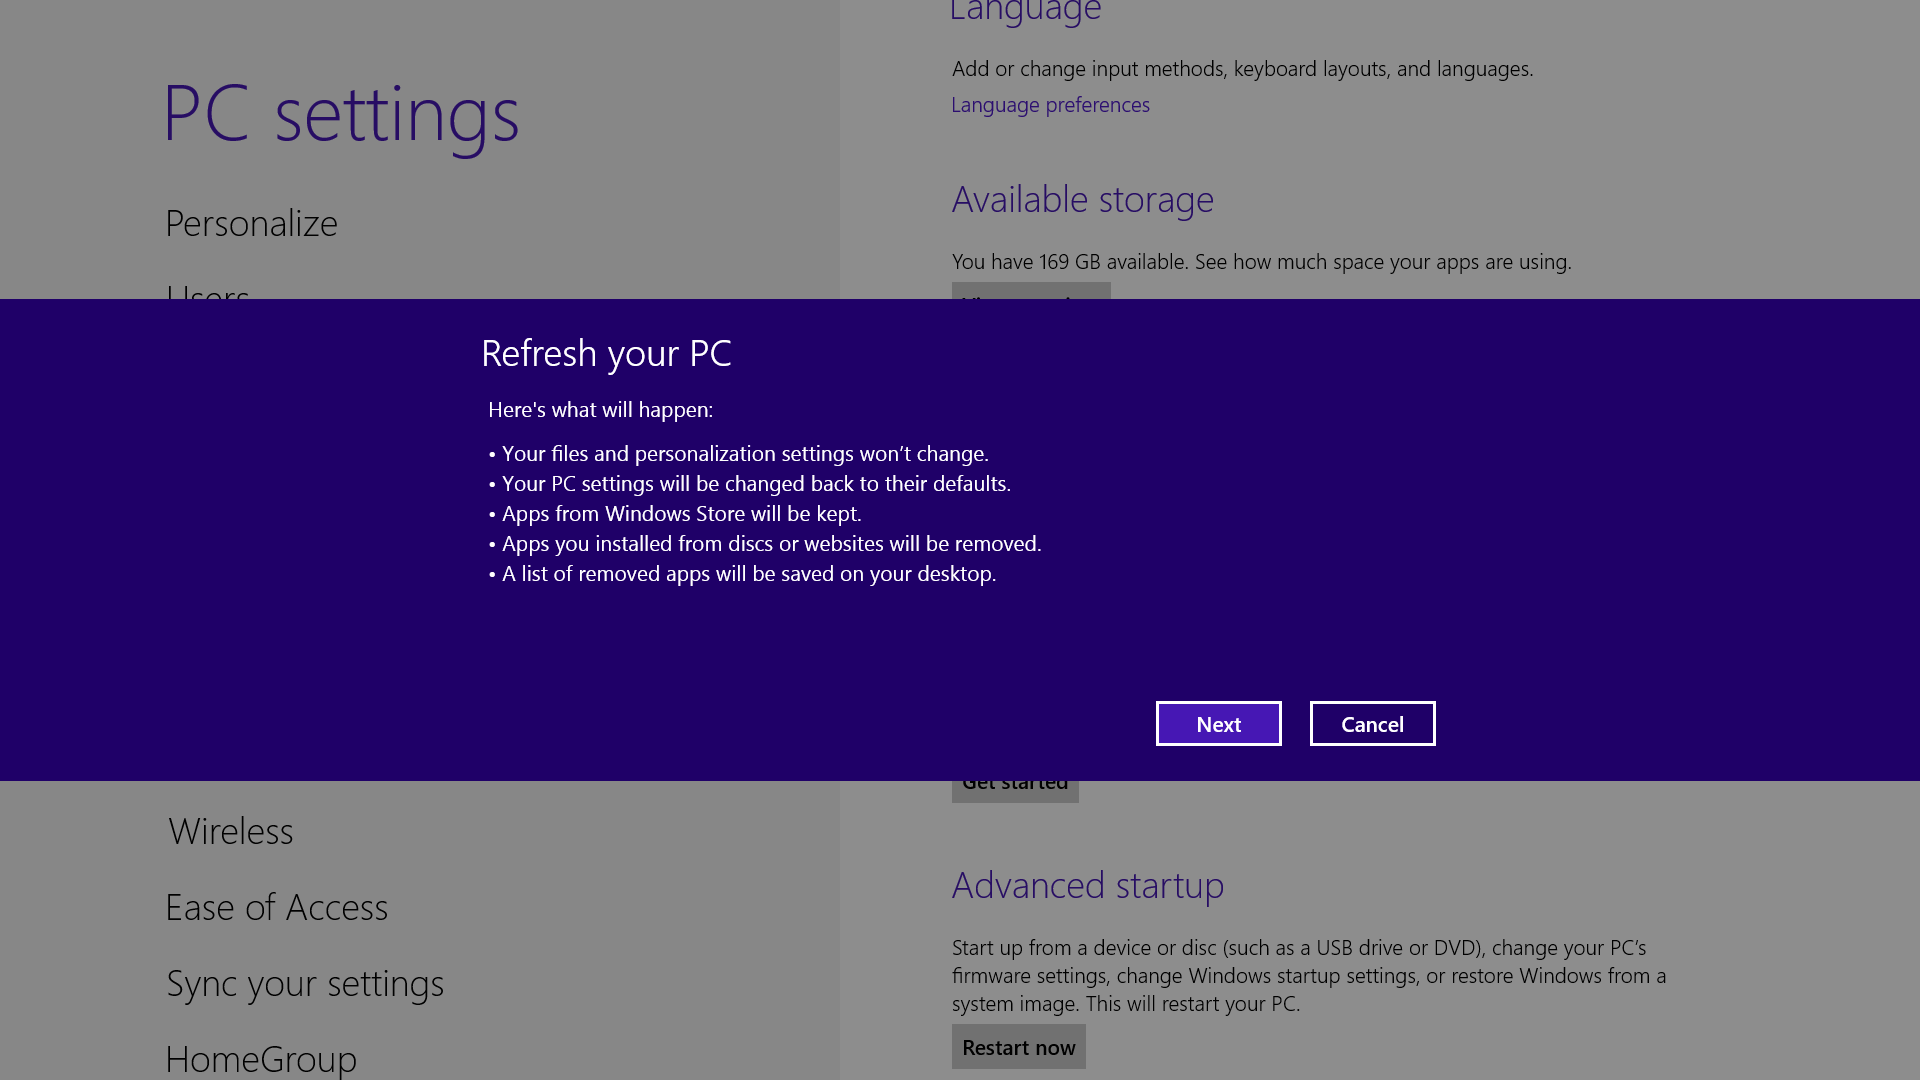
Refresh your PC
Enjoy a fresh PC without losing everything.
If your system is feeling a little sluggish, it may be time for a refresh. In the past we would have to find our copy of Windows 7, back up all of our data, and perform a fresh install to enjoy that back-to-factory-fresh feeling. But now Windows 8 allows you to perform a fresh install from within Windows without losing any data.
In order to perform the refresh, go to Settings and click the Change PC Settings tab near the bottom. Select the General tab and find the "Refresh your PC without affecting your files" section near the middle (you may also select "Remove everything and reinstall Windows" to get the true factory settings treatment). Select "Get started" and press "Refresh." After a few minutes the PC will restart, and you will have a fresh copy of Windows 8.
Start in Safe Mode
Safe Mode is a great way to get into your system when something won't allow you to start up normally. Troubleshooting becomes a breeze when corrupted drivers and files aren't loaded that prevents a system from functioning. It used to be as easy as pressing F8 when the system starts up, but doing so with Windows 8 will take you to Automatic Repair Mode. The trick to getting back to good old fashioned Safe Mode? Hold down the Shift key and press F8 while booting up.
This takes you to the Recovery mode. Select "advanced options," then "troubleshoot," then the "advanced options" again (there are a lot of advanced options). Select Windows Startup Settings and finally the Restart button. This will reboot the computer and give you the option to boot into Safe Mode.
If you need to get into Safe Mode from within Windows, open the dialog box (the Windows key + R) and type "msconfig" (no quote marks). Select the Boot tab and check the Safe boot box. The system will continually boot into Safe Mode until you go back and uncheck the box.
Turn Live Tiles on and off
Use the Live tile option to customize what you want to see.
When looking at the plethora of tiles on your Start screen, the view can get stagnant, despite all the pretty colors.This is where Live Tiles come in. They offer real-time data right on your Start screen, and you don't need to open any apps. For example, the Weather tile will show you the current conditions, and Mail will show you the subject of the latest message you've received.
You can customize which apps are live and which aren't by right-clicking on the tiles. A settings bar on the bottom will pop up with an option to turn the Live Tile on or off. Simply select the preferred option, and you're all set. Note, however, that not all apps have a live, real-time data-streaming option.
Find the Windows games folder
Currently, the games folder used in Windows 7 isn’t present in Windows 8. Fear not; if you install any current-generation PC game that would regularly save to this folder, the folder is automatically created. For a quick way to find it, right-click on the game icon on the Start screen and choose “Open file location” at the bottom.
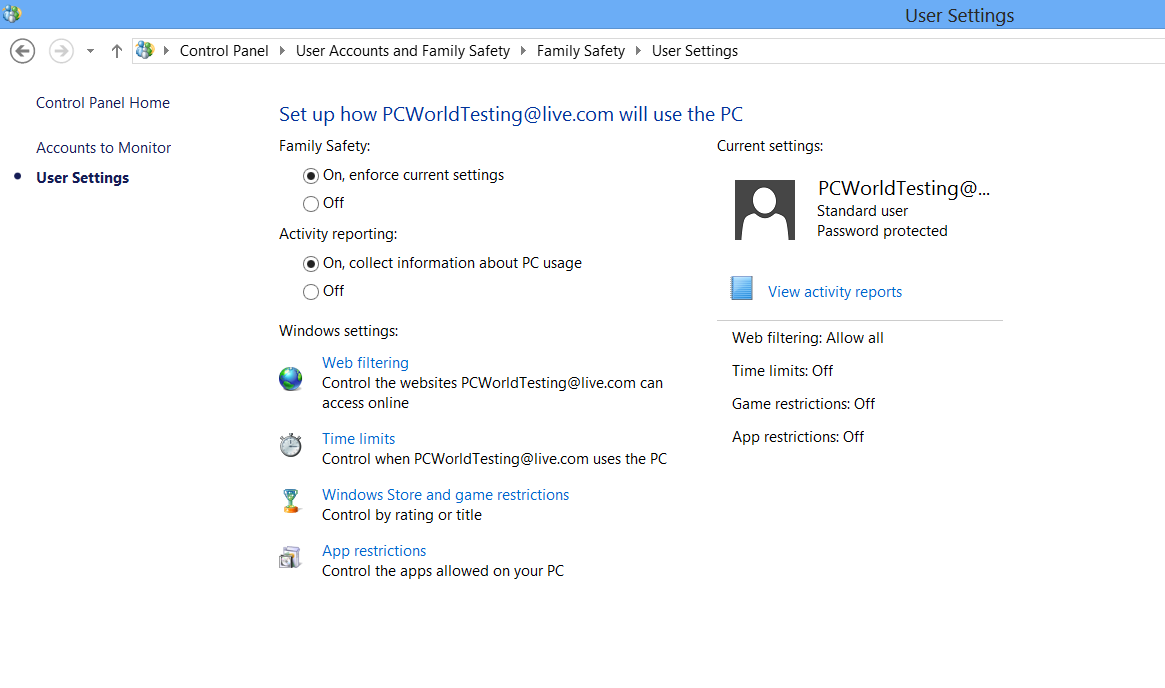
Activate Family Safety
Let your kids play without having to worry.
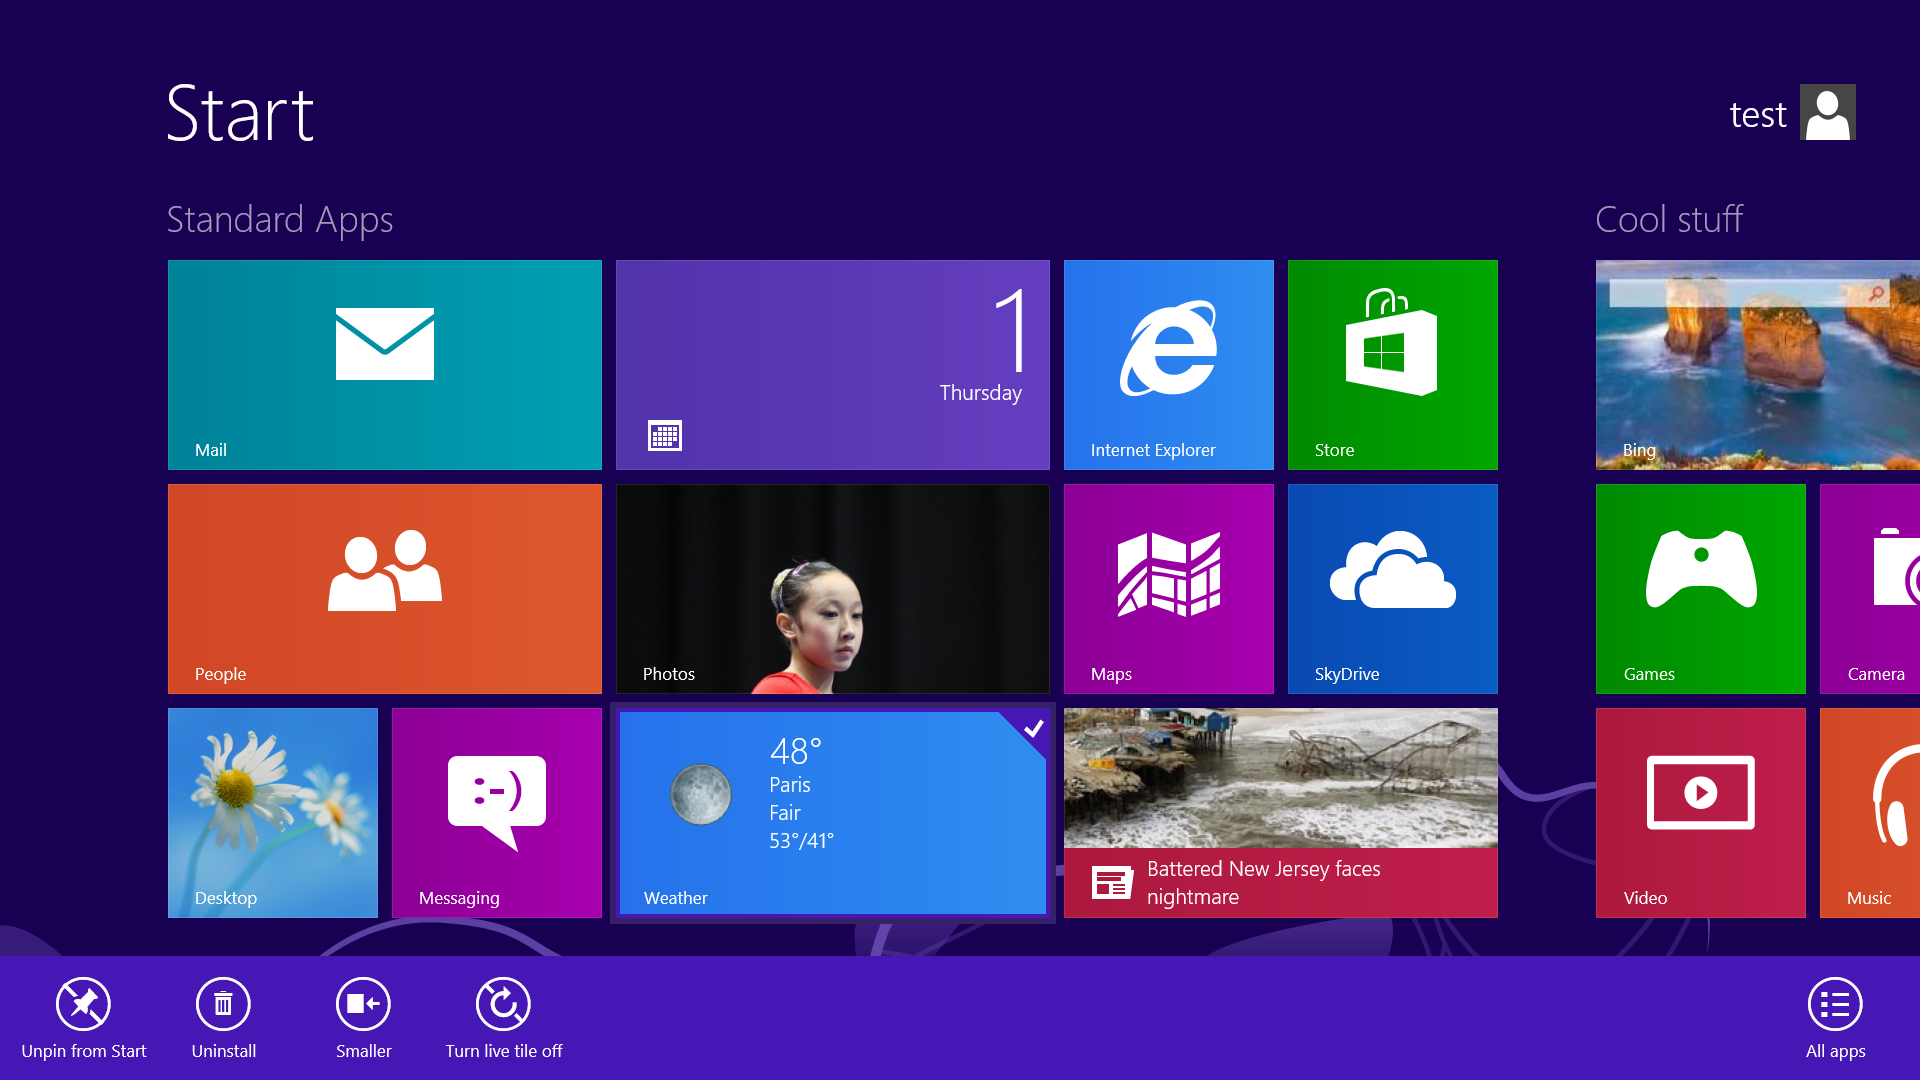
Want to avoid some nasty surprises on your credit card? Create a separate, standard account on the device for your kids (Family Safety can't be applied to an administrator account). You can activate Family Safety by going to the Control Panel, User Accounts,and Family Safety, and selecting the account you would like to apply it to. From these settings you can get reports on the account's activity; set a level of Web filtering; set time limits; and enforce Windows Store, game, and app restrictions.
Shut down with one click
Easy to create button to shut down.
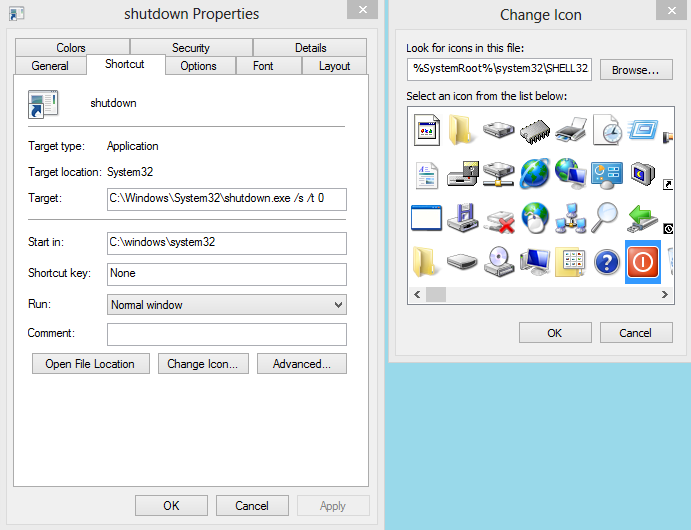
Windows 8 hides the Power button in the Settings menu, forcing a multistep process just to shut down one's PC. But thanks to a crafty shortcut trick, you can pin a Shutdown button right onto the bottom of your desktop. Here's how.
Create a shortcut on your desktop (right-click, go to New, then Shortcut). Enter "shutdown /s /t 0" (with no quotes, and, yes, that's a zero not an "O") as the location of the item, and press Next. Now name the shortcut (prefereably "Shutdown") and press Finish.
Right-click the shortcut, and navigate to Properties. Choose Change Icon in the Shortcut tab, and then OK to leave the warning box. Choose an icon of your choice from the list. In the screenshot above, you'll see we chose a Power button.
Right-click the shortcut again, and select Pin to Start. You can place the icon on your Start screen wherever it's convenient. Clicking it will instantly shut down your computer.
> Run > and then write dcpromo > Click OK